When I was a kid growing up, I always wanted to design and build my own model roller coaster from scratch. To date myself, this was in the early days of the internet, before CoasterDynamix or LEGO roller coaster kits existed. As much as I tried, I lacked the tools and resources to do so. Flash forward to today, and those tools and resources now exist and creative engineers like Dan Fritsche have taken full advantage. Dan has fulfilled my childhood dreams of creating a working model launch coaster by using 3D printing and other tools. Once I saw the fully functioning 3D printed launch coaster, I just had to know more about how it worked so I could live vicariously through Dan’s awesome creation.
C101: Thanks for taking the time to give us more insight for how you designed and built a working 3D printed launch coaster. But first, for those who don’t know you, please introduce yourself!
Dan: I’m Dan Fritsche, a 2019 Mechanical Engineering grad from Iowa State University. Growing up in Minnesota, the only park nearby was Valley Fair, but that and family trips to Cedar Point every summer were enough to get me hooked on coasters at a super young age. When I was 7 and finally tall enough to ride Millennium Force, I saw the “Intamin” decal on the train and realized there must be companies out there that made these things. I knew that someday I had to work for one. In 2018, I had the opportunity of a lifetime to intern at Premier Rides for 7 months. Learning the ins and outs of coaster design, I gained a whole new appreciation for these awesome machines after seeing firsthand how they were built. Going forward, I’d love to get the chance to work at a coaster manufacturer again and will continue to do whatever I can to chase the dream. But for now, designing and printing them myself is good enough until another opportunity comes along.

C101: What made you want to take on the challenge of designing and building your own 3D printed launch coaster?
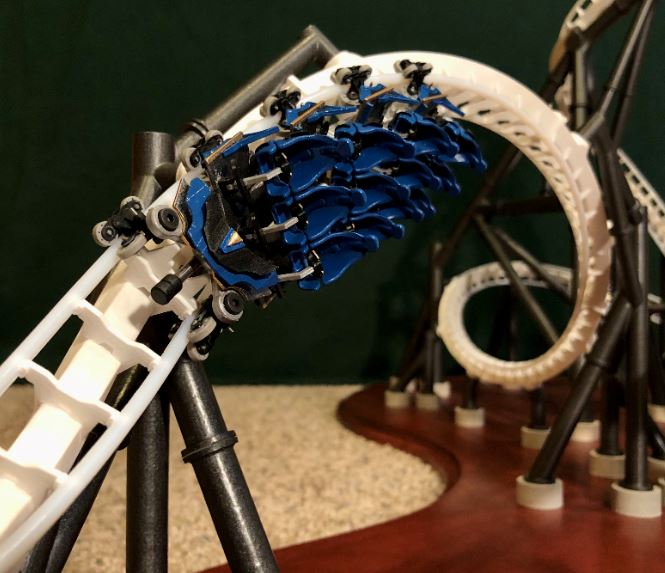
Dan: As a kid I spent hours and hours building K’nex coasters and this was just the next level. K’nex never had the realism I was after and after seeing the functional inverted boomerang model Matt (@print_my_ride) printed in 2017, I figured I could use my 3d modeling experience to do something similar eventually.
C101: Describe the overall process – what did you have to do or figure out first?
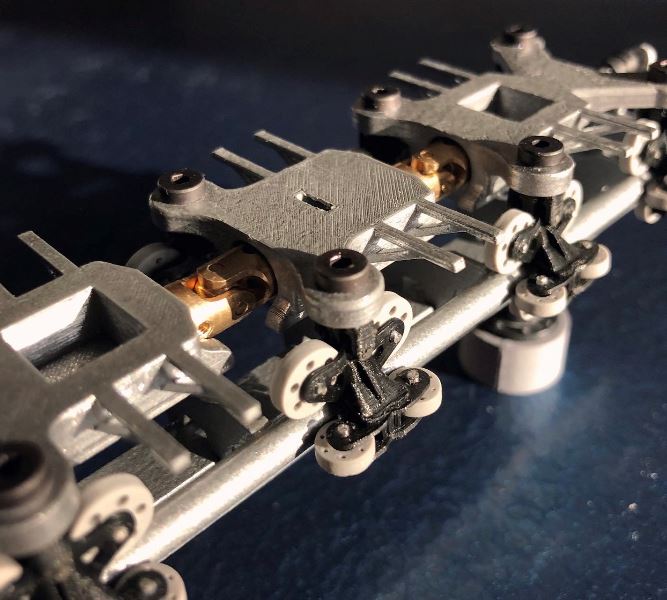
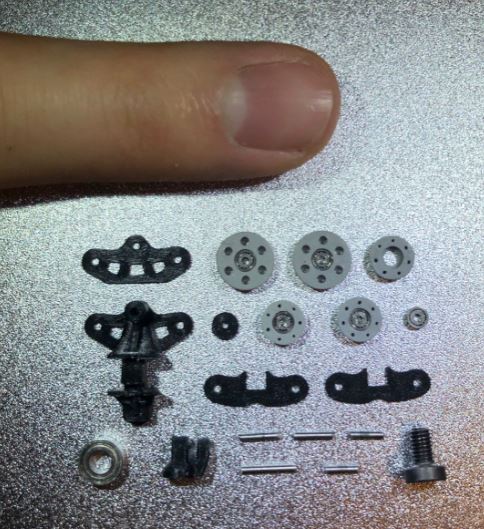
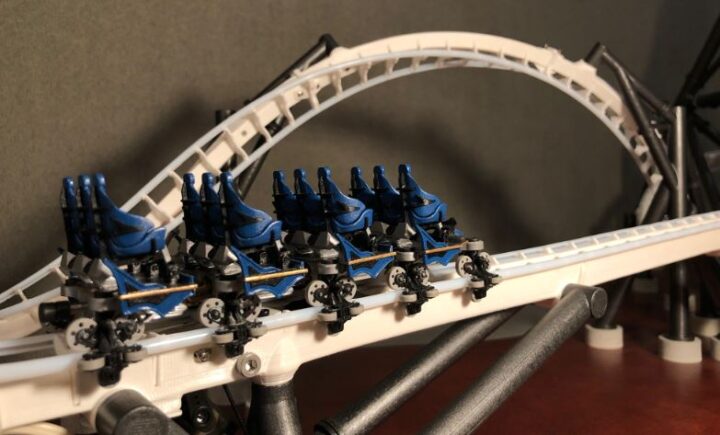
Dan: First off, I had to start by prototyping the train. My biggest goal was to make the model functional and the key to that was making a functional ride vehicle. It took 3 iterations and slight redesigns to get there, but over that time, I was able to figure out the best way to scale down a full-sized train’s construction and maintain all the degrees of freedom and clearances that were needed.
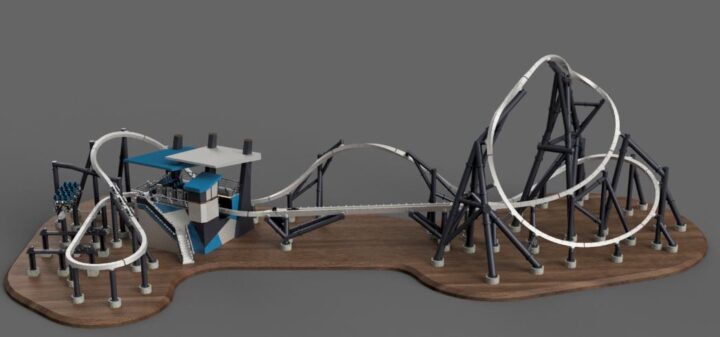
The next thing was coming up with a layout. It had to be short and simple since this whole thing was basically just a proof of concept that I could make a functional coaster in the first place. Once I designed and settled on a layout in NoLimits2 (NL2), I exported the spline coordinates and imported them into Fusion 360 where I hand modeled everything from there. This was all relatively straightforward, but extremely time consuming — around 600 hours for the train, track, columns, station, launch, brake run, etc.
I had already prototyped the launch mechanism about a year before starting this project so most of the R&D there was done thankfully. I just streamlined the design a bit and made it more compact so it could fit inside the station. The only other moving components on the layout were the brake run and station gates, which used simple mechanical assemblies (a four-bar linkage and a linear rotation mechanism).
View this post on Instagram
Throughout the whole process of 3D modeling, I was printing parts as I went so I could verify the design within a few minutes to hours. My poor printer didn’t turn off for a week straight while I was printing all of the track and supports. The relatively fast turnaround time between design and actually being able to assemble the parts was super handy to ensure everything fit together like I wanted them to. Only a handful of parts had to be redesigned throughout the whole process, which I’m pretty proud of.
The last thing was to automate it all, so I put micro servo motors in wherever motion was needed. Then, with the help of one of my friends, wrote a simple code to run the launch mechanism, brakes, station gates, and drive tires.
C101: What was the most challenging part of making your 3D printed launch coaster?
Dan: Definitely the coding — I’m a big mechanical guy and really struggle grasping how to code well. Shout out to Ryan O’Neill for basically writing the code for me.
C101: You’ve name a couple of them already, but what tools did you use?
SOFTWARE
- NoLimits 2 – layout design
- Fusion 360 – solid modeling
- Cura – solid slicing to prepare for printing
- Arduino – coding software for motor control
HARDWARE
- Arduino Uno
- 5 Micro servo motors
- 1 DC motor
PRINTER
- Creality CR-10
TOOLS
- Plotter – printing footer locations
- Electric drill – drilling footer locations
- Skill saw – cutting base shape
- Router – finishing base edges
- Lots and lots (and lots) of sandpaper
C101: Wow, that’s a great list for anyone interested in getting started with designing and 3D printing their own roller coaster model. What advice would you give to a beginner? Where do they even start?
Dan: Definitely recommend taking it slow and not immediately tackling a functional model. Start small and work your way up with a static train and track design after having a solid base of 3d modeling knowledge. Even modeling individual components like bogies will do wonders in building your confidence and teaching you important lessons in what you can and can’t get away with when designing at the scale you’re working at. The most important advice I can give though is to not give up — it’s not going to happen overnight. It’s easy to get frustrated when the model or print isn’t turning out the way you want it to but take a break and come back to it later. Sticking with it is the only way you can get better at this or anything else for that matter.

Finally, I started a Discord with a few other coaster modelers and anyone who’s interested can join. It’s a great resource to help each other out if you’re stuck, get cool ideas for projects, and just share your progress with other likeminded coaster nerds. DM me on Instagram @3d_coasters for an invite link or any questions. I’m more than happy to give my best answer!
C101: And we always wrap up our interviews with this question: what’s your favorite real-life coaster?
Dan: Yikes favorite coaster… what an impossible question. I have a soft spot for Wildfire at Kolmärden and Helix at Liseberg, but I’m going to say the trim-less rides on Steel Vengeance I got in 2018 were some of the best rides I’ve ever had. As a guy who loves airtime, there’s no other way to go than with 27.2 seconds of it on Steve.
C101: Where can people go to follow your projects or learn more about you?
Dan: I’m working on a Weebly website where I’ll have a more in-depth look at the process behind everything, but for now Instagram is my go-to for general project updates. Anyone can feel free to connect with me on LinkedIn too.
Thanks again to Dan for taking the time to answer our questions. We look forward to seeing what future 3D printed coasters you come up with!


Recent Discussion